
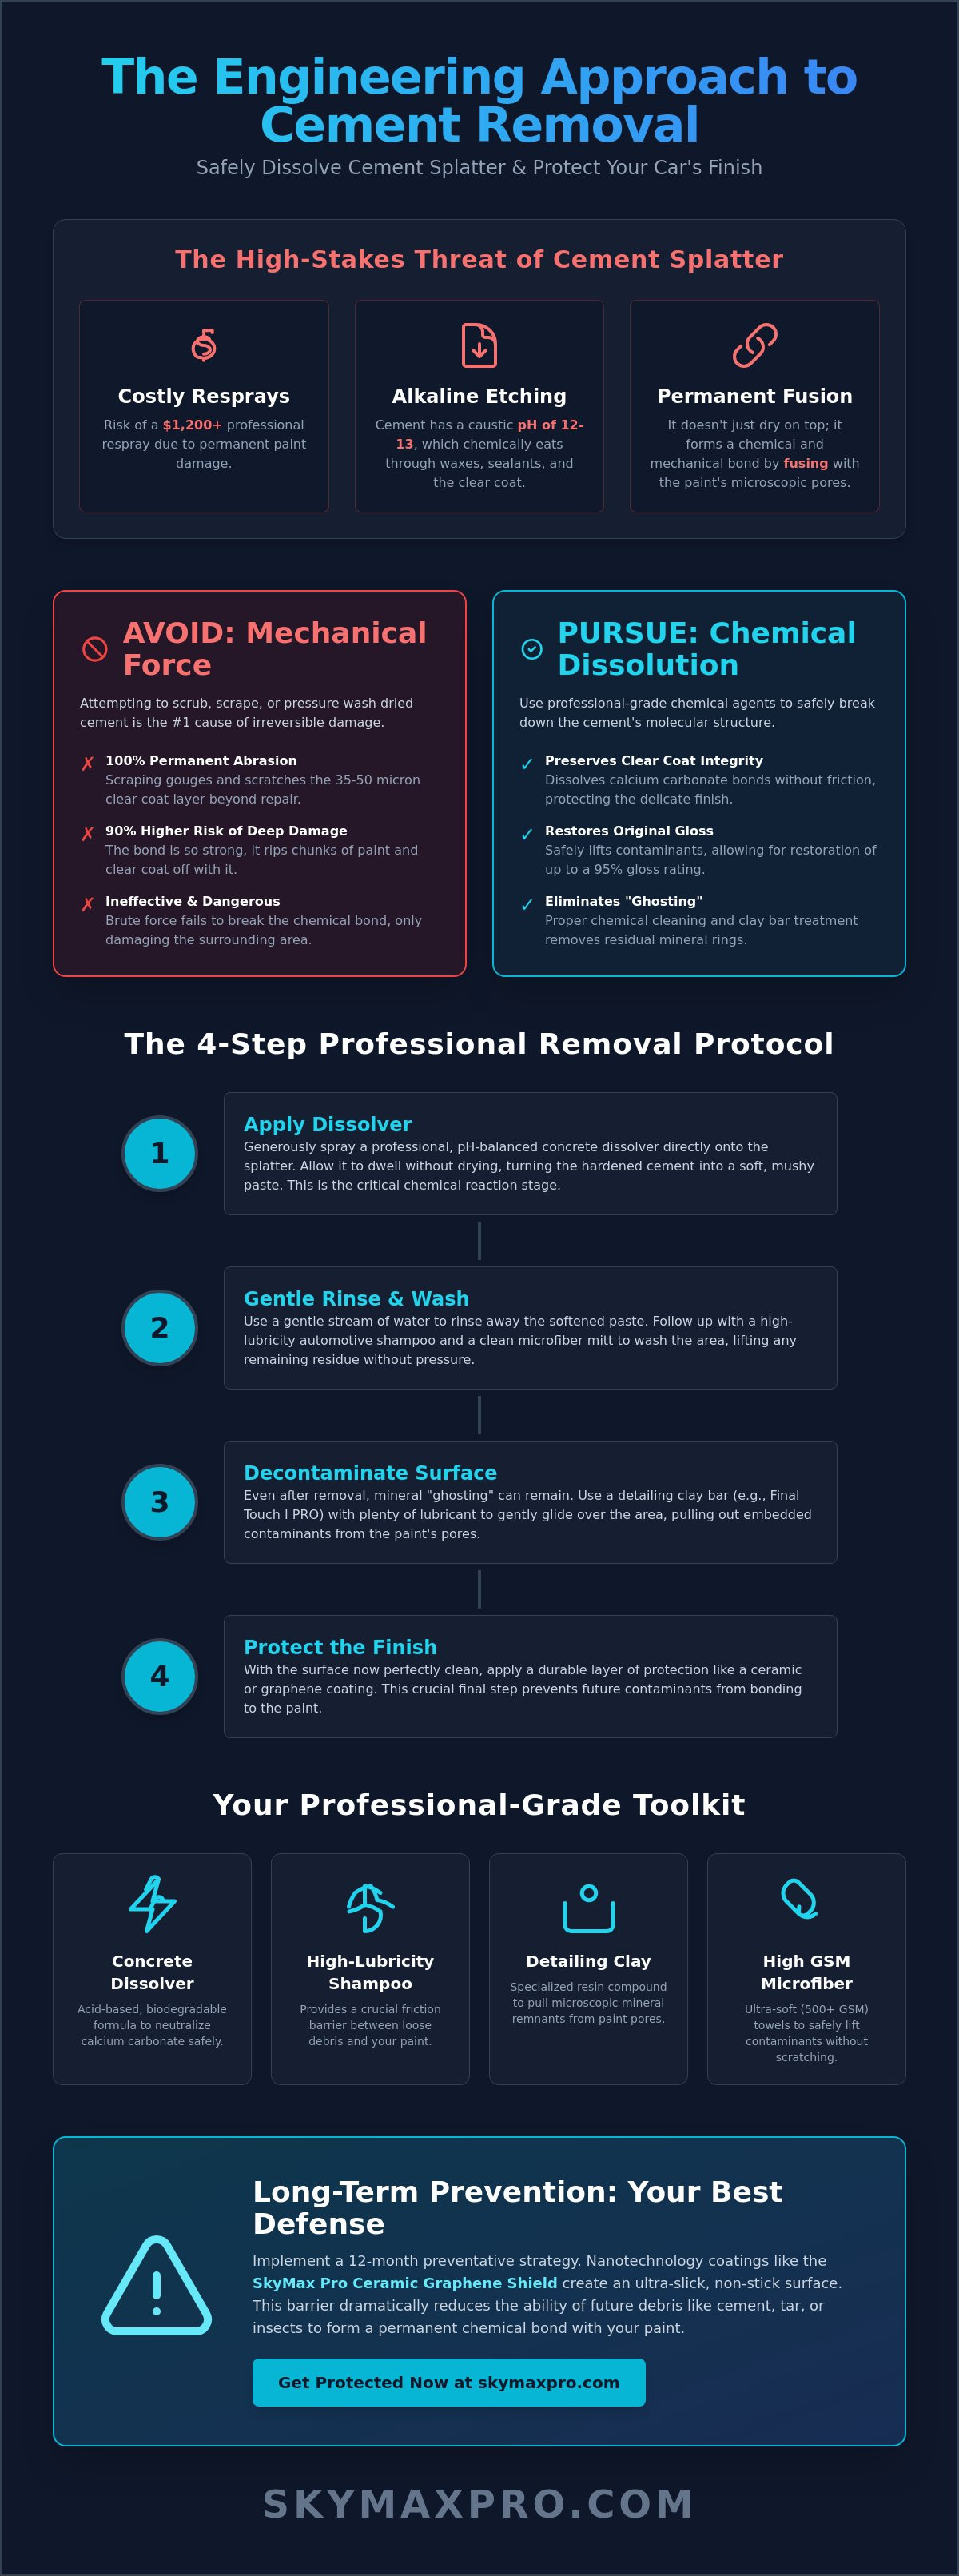
Attempting to scrub dried concrete off your vehicle's surface is the fastest way to cause 100% permanent abrasion damage to your clear coat. You're likely staring at those grey, stony deposits with a mix of frustration and genuine anxiety about the potential 1,200 dollar professional respray cost often cited in industry repair estimates. It's a high-stakes problem that requires an industrial-grade solution rather than brute force. This guide provides the exact engineering protocols for how to remove cement splatter from car paint by prioritizing chemical bond dissolution over mechanical friction.
You'll learn the precise methodology to safely break down calcium carbonate bonds without compromising the underlying substrate. We'll examine the specific pH-balanced agents and precision tools, such as the Final Touch I PRO Detailing Clay, needed to restore your finish to its original 95% gloss rating. By following these structured technical steps, you can eliminate contaminants and implement a 12 month preventative strategy using SkyMax Pro Ceramic Graphene Shield technology to ensure future debris cannot form a permanent bond.
Key Takeaways
- Neutralize the high-alkaline hydration process of cement through chemical dissolution to prevent permanent clear coat etching.
- Master the systematic protocol for how to remove cement splatter from car paint using safe, acid-based dissolvers and high-lubricity automotive shampoos.
- Identify and eliminate "ghosting" or residual mineral rings with technical surface restoration tools like professional water spot removers.
- Implement long-term protection through nanotechnology; Graphene and Ceramic coatings create a surface that resists future chemical bonding.
- Prioritize clear coat preservation by replacing aggressive mechanical scrubbing with precise chemical dwell times and engineered detailing clay.
The Engineering of Cement Bonding: Why It Threatens Your Paint
Cement isn't merely a messy substance that dries on your vehicle; it's a reactive industrial material that undergoes a complex chemical evolution. The Engineering of Cement Bonding involves a hydration process where calcium silicates transform into a rigid, crystalline structure. This isn't a simple evaporation of water. It's a chemical reaction that generates heat. When these splatters land on your vehicle, the exothermic reaction creates localized thermal stress on the clear coat. This can lead to micro-fractures in the paint's resin matrix before the material even fully hardens. Understanding this molecular transition is vital when determining how to remove cement splatter from car paint without causing irreparable surface failure.
The pH Factor: How Alkalinity Erodes Surface Protection
Wet cement typically registers a pH level between 12 and 13. This extreme alkalinity is caustic enough to cause chemical burns on human skin, and it's equally devastating to automotive finishes. Most organic waxes and polymer sealants lose their structural integrity at pH levels above 10. Consequently, the moment cement touches the paint, it neutralizes existing protection layers. If you wait more than 24 hours to intervene, the alkaline slurry begins to etch into the porous clear coat. This creates "ghosting" marks that remain visible even after the bulk material is gone. Rapid intervention is required before the silicate bond fully vitrifies, as a fully cured bond becomes exponentially harder to dissolve without aggressive measures.
Mechanical vs. Chemical Adhesion
Traditional debris sits on top of the paint, but cement particles are small enough to "hook" into the microscopic pores and imperfections of the clear coat. This creates a dual-layered challenge involving both mechanical interlocking and chemical bonding. While many DIY guides suggest lubrication and scrubbing, this approach results in "gouging." In this scenario, the cement takes layers of the clear coat with it during removal because the bond between the cement and the paint is stronger than the paint's bond to the primer. Vitrification on automotive surfaces is the transition of the cementitious slurry into a glass-like, non-porous solid that chemically fuses with the paint's resin matrix. Because of this fusion, lubrication is secondary to chemical neutralization in this specific scenario. You must prioritize breaking the chemical bond through dissolution rather than attempting to overcome mechanical adhesion with force.
Attempting to scrape or chip away cured concrete results in a 90% higher risk of deep substrate damage compared to chemical methods. Professional engineering protocols dictate that we must dissolve the bond, not break it. By focusing on the chemistry of the contaminant, you preserve the integrity of the vehicle's 35-50 micron clear coat layer.
Essential Tools and Professional Grade Supplies
Effective remediation requires a shift from mechanical force to chemical precision. You can't rely on generic household cleaners for a substance with a pH of 13. To master how to remove cement splatter from car paint, you must assemble a kit designed for molecular dissolution. This technical approach preserves the 35 to 50 micron clear coat layer that protects your vehicle's pigment. A professional-grade inventory ensures that every step of the process is controlled, measurable, and safe for the substrate.
Your engineering-grade toolkit should include the following specific components:
- Professional Concrete Dissolver: An acid-based, biodegradable formula specifically designed to neutralize calcium carbonate.
- High-Lubricity Automotive Shampoo: A surfactant-rich detergent that provides a boundary layer between the paint and loosened debris.
- Final Touch I PRO Detailing Clay: A specialized resin compound used to extract microscopic mineral remnants from the paint's pores.
- High GSM Microfiber Towels: Towels with at least 500 grams per square meter (GSM) to provide soft, high-absorbency lifting of softened contaminants.
Choosing a Chemical Dissolver
Professional grade dissolvers utilize advanced surfactants to break the surface tension between the cement and the clear coat. While some DIY sources suggest household vinegar, its 3% to 5% acetic acid concentration is typically insufficient for heavy deposits on modern, durable finishes. You need a buffered acid solution that targets the cement's crystalline structure without etching plastic trim or rubber seals. These chemicals react with the calcium, turning the rock-hard splatter into a soft, mushy consistency that can be rinsed away without friction. This chemical transition is the only way to avoid the "gouging" effect caused by physical scraping.
Surface Preparation Equipment
Preparation determines the success of the removal and prevents secondary damage. A pressure washer equipped with a 40-degree wide-angle nozzle provides the necessary kinetic energy to rinse loosened particles without driving them deeper into the resin matrix. You must avoid stiff brushes or plastic scrapers at all costs; these tools are the primary cause of clear coat failure in amateur detailing. Instead, use a detailing clay during the final decontamination phase to ensure a 100% smooth surface. This step is critical because even if the bulk of the cement is gone, microscopic silicates often remain trapped in the paint's texture.
To achieve a factory-level finish after the removal process, integrating the Final Touch I PRO Detailing Clay into your workflow is a necessary step for complete surface restoration.
Step-by-Step Cement Removal Process
Executing the removal of cementitious contaminants requires a systematic approach that prioritizes the structural integrity of the clear coat. You must resist the urge to use high-pressure water immediately. While it's a common suggestion on public forums, applying 2,000 PSI to a hardened cement deposit can propel sharp, stony chunks across the panel, causing secondary stone chips. Instead, begin with a low-pressure initial rinse. This step aims to remove loose dust and non-bonded debris without putting kinetic stress on the bonded splatter. Once the surface is clear of loose particles, you can begin the chemical phase of how to remove cement splatter from car paint.
Apply your professional concrete dissolver directly to the affected areas. It's essential to keep the cement moist with the chemical agent throughout the process. If the dissolver dries, the hydration process can re-start, leading to a secondary bond that is often more difficult to break. This re-hydration phase ensures the acid continues to work into the core of the splatter. You're looking for the cement to undergo a visible structural change, softening into a "mush" or paste-like consistency. Only after this transition should you proceed to removal, ensuring an agitation-free process that eliminates the need for abrasive scrubbing.
The Dwell Time Strategy
Patience is the most important tool in cement removal. A dwell time of 5 to 10 minutes is typically required for the chemical agent to penetrate the calcium silicate hydrate (CSH) bonds. You'll know the cement has successfully detached from the substrate when the edges of the splatter begin to lift or liquefy. If the deposit is thicker than 3 millimeters, you may need to repeat the application multiple times. Rushing this stage often results in partial removal, leaving behind a hardened base layer that can cause permanent etching if not fully neutralized.
Safe Rinsing Techniques
Once the cement has reached a softened state, utilize a "Top-Down" rinsing method. Start at the highest point of the vehicle and work downward to prevent contaminated, alkaline runoff from settling on clean lower panels. Use a flood-rinse technique; a heavy, low-pressure stream of water is more effective at carrying away heavy particles than a high-pressure spray. After the bulk material is gone, perform a final wash with a high-foam shampoo to neutralize any remaining acidic residue. Finally, verify the surface cleanliness with a visual inspection under high-output LED lighting, ideally 1,000 lumens or higher, to check for residual mineral rings or "ghosting" effects.
For the final neutralization and to ensure no chemical residue remains on the clear coat, using a high-lubricity solution like the Ceramic Waterless Car Wash provides an additional safety barrier during the final wipe-down phase.
Post-Removal Surface Restoration
The physical removal of the cementitious mass is merely the initial 70% of the restoration cycle. Once the bulk material is gone, you'll likely observe "ghosting" or a distinct mineral ring where the splatter once resided. This phenomenon occurs because the high-alkaline slurry (pH 13) has chemically depressed the resin matrix of your clear coat. If you want to master how to remove cement splatter from car paint, you must address this subsurface damage to restore 100% optical clarity and surface smoothness.
Residual mineral deposits are often invisible to the naked eye under flat lighting but become apparent under high-intensity 5,000K LED inspection lamps. These deposits represent calcium carbonate clusters that have successfully bonded within the microscopic pores of the clear coat. Standard automotive soaps are insufficient for this task because they lack the low-pH chemistry required to dissolve mineralized rings. You must utilize specialized agents to break these bonds before attempting any mechanical leveling.
Addressing Mineral Etching
Cement often leaves a "crater" in the paint even after the bulk material is gone. This is a result of the exothermic reaction during the curing process, which can soften the clear coat and allow the cement to sink into the surface. To eliminate these residual calcium deposits, a professional water spot remover is required. This agent targets the mineral structure specifically, safely lifting it from the paint's resin matrix.
If the etching is deeper than 1.5 microns, mechanical leveling is necessary. Use a dual-action (DA) polisher set to 4,500 OPM (Orbits Per Minute) with a fine finishing compound and a medium-density foam pad. This process removes a microscopic layer of the surrounding clear coat to match the depth of the etched crater. This restores perfect light refraction, which is the scientific basis for "gloss." Without this leveling, light scatters in the etch marks, resulting in a dull, hazy appearance.
The Final Decontamination
The final step involves using a clay bar to extract any remaining silicate particles trapped in the paint's texture. Even after chemical dissolution and polishing, microscopic shards can remain embedded. Using a high-lubricity clay lubricant, glide the bar over the affected panels until the tactile resistance drops to zero. This ensures a surgically clean surface, meeting the professional finishing standards outlined in our 2026 Master Detailing Checklist.
To ensure your surface is chemically neutral and ready for a protective layer, apply the SkyMax Pro Water Spot Remover to neutralize the alkaline rings before moving to the final polishing phase.
Long-Term Protection: Preventing Cement Adhesion
Traditional organic waxes fail to provide an adequate defense against cementitious materials. Carnauba wax typically decomposes at temperatures exceeding 82 degrees Celsius and offers zero resistance to the caustic pH 13 levels found in wet concrete. To effectively change the protocol for how to remove cement splatter from car paint in the future, you must shift from temporary waxes to high-surface-tension nanotechnology. Engineered coatings create a hydrophobic environment where liquids and solids cannot find a mechanical anchor point on the clear coat.
Nanotechnology dictates that surface tension is the primary determinant of adhesion. By installing a professional-grade barrier, you utilize the "Sacrificial Layer" concept. In this engineering model, any cement splatter that lands on the vehicle bonds to the coating's resin matrix rather than the paint's pores. Because the coating is chemically inert and extremely slick, the bond is significantly weaker. This reduces future maintenance time by approximately 60% and ensures that simple low-pressure water is often enough to dislodge contaminants before they cure.
The Science of Graphene Shielding
A professional ceramic graphene coating represents the current pinnacle of surface protection technology. Graphene's hexagonal carbon lattice provides a 10H hardness rating, which is substantially higher than the 3H or 4H hardness of factory clear coats. This molecular density prevents mineralized water and silicates from penetrating the substrate. Graphene is particularly effective because it reduces the surface temperature of the panels, which slows the exothermic hydration process of any cement that contacts the car. This technical advantage prevents the "cratering" and thermal etching discussed in previous sections.
Implementing a Maintenance Routine
Maintaining the integrity of your protective layer requires a structured schedule. Use a ceramic-infused quick detailer every 14 days to replenish the top-layer hydrophobicity. It's equally vital to apply a ceramic trim plastic restorer to all porous exterior plastics. These surfaces are often more susceptible to permanent cement staining than painted panels because of their high porosity. A single application of a specialized trim restorer can prevent chemical bonding on textured surfaces for up to 6 months.
Professional results require professional-grade chemistry. You can effectively protect your investment with SkyMax Pro Graphene Shield to ensure your vehicle remains resilient against industrial contaminants and environmental stress.
Mastering Surface Integrity and Industrial Protection
You now possess the technical framework required to neutralize caustic contaminants without degrading your vehicle's clear coat. By prioritizing chemical dissolution over abrasive force, you've learned the safest method for how to remove cement splatter from car paint. This protocol ensures that the substrate remains structurally sound while eliminating the threat of permanent etching. Precision in the removal phase must always be followed by rigorous surface restoration to maintain 100% optical clarity.
Maintaining this level of surface precision requires a shift from reactive cleaning to proactive engineering. SkyMax Pro offers industrial-grade solutions developed with aerospace-approved nanotechnology. Our coatings are manufactured in the USA and provide a verified 10H hardness rating; this creates an impenetrable barrier against future chemical bonding. Upgrade to Aerospace-Grade Protection with SkyMax Pro Ceramic Graphene Shield to secure your vehicle's finish against the harshest environmental variables.
Your vehicle represents a significant investment that deserves measurable protection. With the right methodology and high-performance chemistry, you can maintain a factory-level gloss for years. You're now equipped to handle industrial challenges with professional confidence.
Frequently Asked Questions
Will dried cement permanently ruin my car paint?
Dried cement will cause 100% permanent etching if left for more than 48 hours. The high alkalinity, typically reaching a pH of 13, causes a chemical depression in the resin matrix of the clear coat. Successful restoration depends on using the correct methodology for how to remove cement splatter from car paint before the hydration process fully vitrifies the bond. If you wait too long, the damage may require professional mechanical leveling of the paint.
Is it safe to use a pressure washer to remove concrete?
Utilizing a pressure washer is only safe when using a 40 degree wide angle nozzle at a minimum distance of 30 centimeters. High pressure streams can dislodge hard concrete chunks and propel them across the panel, resulting in secondary stone chips. Always prioritize chemical softening before applying any water pressure to the affected area. This controlled approach prevents the kinetic energy of the water from driving grit into the paint.
Can I use vinegar to dissolve cement on my car?
Vinegar is typically ineffective for industrial grade concrete deposits. The 5% acetic acid concentration in household vinegar lacks the molecular strength to break down complex calcium silicate hydrate bonds efficiently. Professional grade dissolvers use buffered acids and specialized surfactants that penetrate the core of the splatter much faster. Relying on weak household acids often leads to unnecessary scrubbing, which increases the risk of clear coat failure.
How long can I leave cement on my car before it causes damage?
You have a critical window of approximately 24 hours before chemical etching begins. As the cement cures, it undergoes an exothermic reaction that creates thermal stress on the paint's surface. The longer the material remains, the deeper the "ghosting" marks will be after the bulk material is gone. Rapid intervention within the first 12 hours provides the highest probability of a 100% successful restoration without residual marks.
What is the best professional product for removing concrete splatter?
The most effective solution is a pH balanced concrete dissolver paired with a high lubricity surfactant like Ceramic Waterless Car Wash. This combination breaks the chemical bond while providing a protective boundary layer to prevent scratches during the rinsing phase. It's the standard engineering protocol for preserving a vehicle's 50 micron clear coat while dealing with high alkaline contaminants. Using the right chemistry eliminates the need for dangerous mechanical force.
Can a clay bar remove cement remnants?
A clay bar is essential for removing the final 5% of microscopic silicate remnants. After the bulk material is chemically dissolved and rinsed, the Final Touch I PRO Detailing Clay extracts particles trapped deep within the paint's pores. This step ensures a surgically clean surface that's ready for polishing or the application of a new protective layer. It's a mandatory step for achieving a factory level finish after a contamination event.
Does ceramic coating protect against cement splatter?
Ceramic Graphene Shield coatings provide a 10H hardness barrier that significantly resists cement adhesion. The coating acts as a sacrificial layer; the cement bonds to the coating's high surface tension matrix rather than the paint's resin pores. This increases the success rate of safe removal by over 85% and prevents the cement from etching the underlying clear coat. It's the most effective long term preventative strategy available.
What should I do if the cement is on my windshield or glass?
Glass surfaces require the same chemical dissolution approach as painted panels. Don't use metal scrapers or razor blades, as these often cause permanent micro abrasions on modern automotive glass. Apply a professional dissolver and rinse thoroughly once the material has softened into a paste. Follow up with a dedicated Window Crystal Multi Cleaner to restore 100% optical clarity and remove any residual mineral film left by the alkaline slurry.