
The assumption that professional-grade paint correction requires high-speed rotary machinery is a technical misconception that often leads to irreversible clear coat damage in inexperienced hands. You've likely felt the frustration of seeing spider-web scratches under direct sunlight, yet the risk of burning through using a machine feels too high. It's common to feel physically exhausted after ineffective polishing attempts that fail to actually level the surface. Mastering how to remove swirl marks by hand isn't about brute force. It's a controlled engineering exercise in surface leveling that relies on abrasive physics rather than just elbow grease.
By understanding the mechanics of friction and surface tension, you can achieve a swirl-free, mirror-like finish without expensive equipment. This guide provides a comprehensive framework for manual restoration, focusing on the mechanical interaction between specialized abrasives and clear coat polymers. We'll examine the critical differences between Super Micro Abrasive Technology (SMAT) and Diminishing Abrasive Technology (DAT). You'll learn to select products that actually level the paint rather than just filling gaps, ensuring your results are both measurable and permanent.
Key Takeaways
- Analyze the microscopic geometry of swirl marks to understand how surface leveling restores light refraction and depth.
- Evaluate the performance differences between SMAT and DAT abrasive technologies to ensure consistent cutting action during manual application.
- Master the precise protocol for how to remove swirl marks by hand by utilizing the 12x12-inch sectioning method for optimal pressure distribution.
- Identify why mechanical decontamination using Final Touch I PRO Detailing Clay is a critical engineering prerequisite before any abrasive work begins.
- Manage surface thermodynamics and friction levels to prevent clear coat softening while preparing the surface for long-term chemical protection.
The Physics of Paint Defects: Understanding Swirl Marks and Scratches
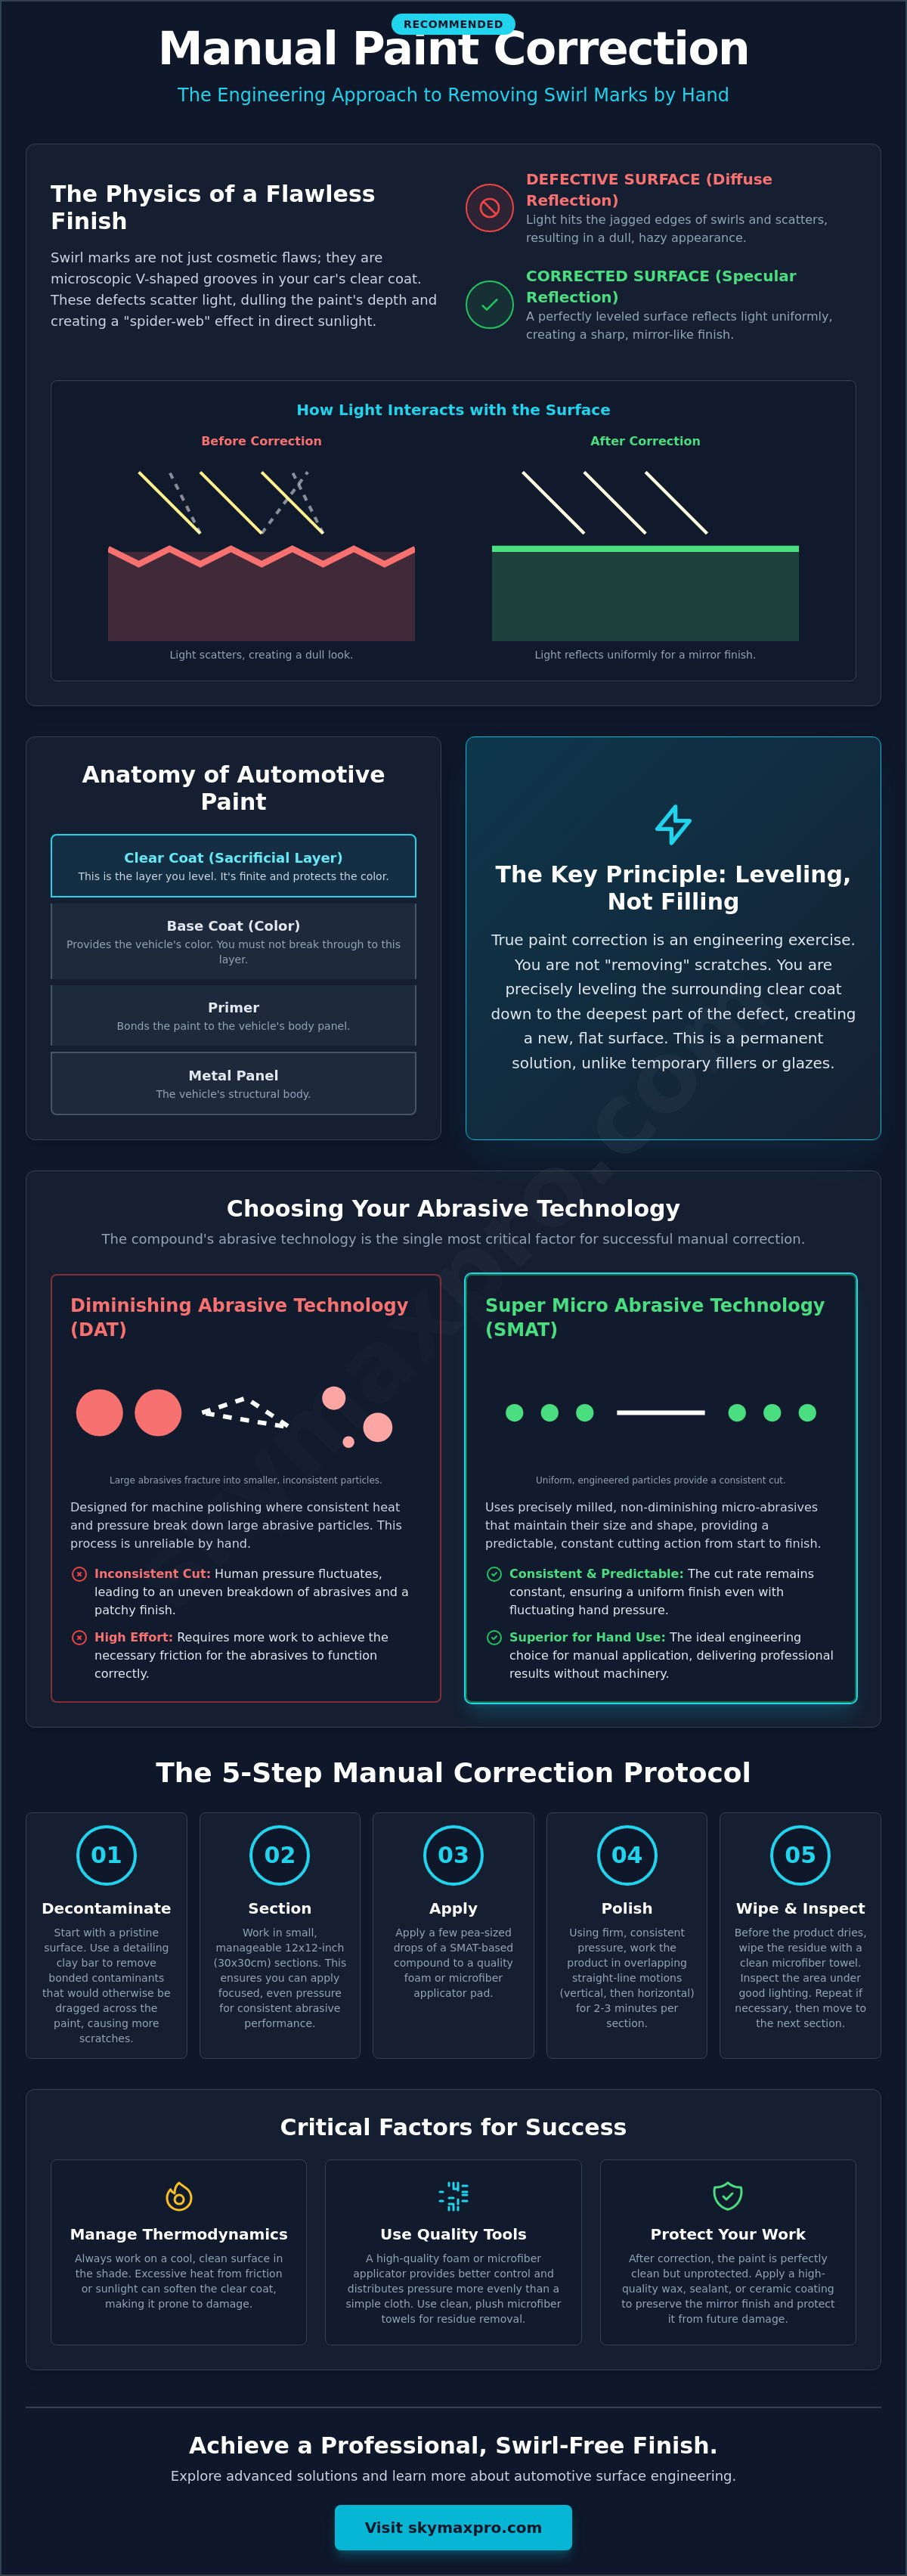
Swirl marks are not merely aesthetic inconveniences; they are microscopic V-shaped grooves etched into the uppermost layer of the clear coat. When high-intensity light hits these jagged edges, it doesn't reflect uniformly. Instead, the light refracts and scatters in multiple directions. This optical phenomenon creates the "spider-web" effect that becomes visible under direct sunlight. While many assume machine correction is the only solution, understanding how to remove swirl marks by hand allows for a high-precision approach that prioritizes the structural integrity of the paint. Manual work provides a tactile feedback loop that prevents the excessive material removal often associated with high-speed rotary tools.
Anatomy of the Clear Coat
To restore a surface, one must first understand the automotive paint composition. Modern vehicles typically feature a multi-stage finish consisting of a primer, a base color coat, and a final transparent resin known as the clear coat. This top layer is a finite, sacrificial barrier. Surface restoration is the process of mechanical leveling. You aren't "removing" a scratch in the traditional sense; you are lowering the surrounding clear coat to the floor of the defect. It's critical to distinguish this from "filling," which uses glazes or waxes to temporarily mask grooves. True correction involves removing a microscopic amount of material to create a perfectly flat plane.
Light Reflection vs. Refraction
The visual quality of a vehicle's finish is determined by how it manages light. A defect-free surface facilitates specular reflection, where light bounces off the paint at the same angle it arrived, resulting in a mirror-like appearance. Surface defects cause diffuse reflection. Light hits the angled walls of the V-shaped swirl and scatters, which dulls the paint's natural depth and clarity. Achieving a mirror finish requires transforming that jagged topography into a level surface. Before any correction begins, the paint must be mechanically decontaminated. Using a product like Final Touch I PRO Detailing Clay ensures you are working directly on the clear coat rather than dragging bonded contaminants across the surface, which would introduce further defects.
Distinguishing Defects and Safety
Not all paint imperfections are identical. Swirl marks are generally shallow and cover large areas, whereas RIDS (Random Isolated Deep Scratches) are localized and penetrate deeper into the resin. Hand correction is the preferred engineering choice for thin or aged clear coats. High-speed machines generate significant thermal energy, which can soften the clear coat and lead to "strike-through" where the paint is permanently destroyed. Learning how to remove swirl marks by hand gives you the ability to manage friction and heat at a granular level, ensuring the safety of the substrate while achieving professional-grade results.
Selecting Abrasive Technology: SMAT vs. DAT for Manual Correction
The efficacy of manual paint restoration depends entirely on the abrasive physics within the compound. Traditional Diminishing Abrasive Technology (DAT) utilizes large abrasive crystals designed to fracture into smaller particles as they're worked. This breakdown process is highly dependent on consistent pressure and heat. When you're learning how to remove swirl marks by hand, DAT often proves inconsistent because human force naturally fluctuates. Super Micro Abrasive Technology (SMAT) solves this by using non-diminishing, sub-micron particles that maintain the same size throughout the entire cycle. This provides a constant "cut" rate, making it the superior engineering choice for manual leveling where predictable results are paramount.
Understanding the chemical and physical composition of your compound is as vital as the step-by-step paint correction process itself. Modern formulations often utilize aerospace-grade nanotechnology to address the high-density polymers found in contemporary hard clear coats. These nano-sized particles ensure a uniform finish by engaging more surface area per stroke than traditional, larger-grained abrasives. This precision is what allows for the removal of defects without the aggressive scouring often seen in older, consumer-grade products.
The Role of Nanotechnology in Polishing
Nano-abrasives eliminate the "hazing" effect common in legacy compounds. Because these particles are engineered at a molecular scale, they provide a refined finish with significantly less physical effort. Uniformity is the key variable here. Without the high RPMs of a machine, you rely on the abrasive's inherent geometry to perform the work. High-quality lubricants are integrated into these formulations to encapsulate the removed clear coat particles. This suspension prevents the debris from re-marring the surface during the hand-buffing process. For the best results, applying a high-solids ceramic coating after correction ensures the leveled surface remains protected against future environmental degradation.
Choosing Your Applicator Material
The applicator serves as the mechanical interface between your hand and the substrate. Microfiber applicators are the "heavy-duty" choice. The individual fibers increase the total surface area of the abrasive, providing more "bite" for initial correction. Foam pads of varying densities are reserved for the final finishing stage to enhance gloss and clarity. Engineering a mirror finish requires moving from high-density microfiber to soft, closed-cell foam. You should strictly avoid cotton materials. Cotton fibers are irregular and often introduce secondary scratches, undermining the precision required for professional-grade restoration. Mastering how to remove swirl marks by hand is impossible without an applicator that maintains a uniform distribution of force across the working area.
The Manual Correction Protocol: A Step-by-Step Engineering Approach
Executing paint restoration without a machine requires a disciplined, multi-stage protocol to ensure surface uniformity. The process begins with mechanical decontamination. You must use detailing clay to extract bonded industrial fallout, brake dust, and environmental proteins from the clear coat pores. Skipping this step is a fundamental technical error. If these contaminants remain, the polishing pad will trap and drag them across the panel, introducing deep, linear scratches that undermine your efforts. Proper preparation ensures the abrasive particles engage directly with the clear coat resin rather than surface debris.
Precision in how to remove swirl marks by hand depends on limiting the work area. You should never attempt to polish an entire panel at once. Instead, divide the surface into 12x12-inch sections. This specific dimension is the maximum effective area where a human operator can maintain consistent downward pressure and stroke velocity before product drying or physical fatigue occurs. Within these boundaries, employ a "cross-hatch" pattern. Move the applicator in straight, horizontal lines, followed by vertical lines, ensuring a 50% overlap between each pass. This systematic approach guarantees that every square millimeter of the section receives an identical number of abrasive cycles.
Pre-Correction Surface Preparation
A standard maintenance wash is insufficient for professional-grade correction. You must perform a strip wash using a high-alkaline degreaser like Heavy Duty Red Power Degreaser to remove legacy waxes and silicone-based sealants. Once the surface is "naked," use a 15% Isopropyl Alcohol (IPA) wipe-down to strip any remaining polishing oils. Inspection is the final pillar of preparation. Use a high-CRI (Color Rendering Index) light source to reveal the true topography of the defects. Without proper illumination, you cannot verify if you have actually leveled the grooves or simply filled them with lubricant.
The Application Technique
Mechanical efficiency is dictated by the science of friction and wear. You must prime the applicator pad by applying a thin, even layer of compound across the entire face. A dry pad creates localized "hot spots" and dry-buff scratches. When cutting, apply firm palm pressure to maximize abrasive engagement. As you transition to the finishing stage, switch to "two-finger" pressure to allow the nano-abrasives to refine the surface without adding new tension. Work the product until it becomes translucent, then remove the residue immediately. Allowing spent compound to bond to the surface creates a secondary cleanup task that risks marring the newly leveled finish. Mastering how to remove swirl marks by hand requires this balance of force and timing.
Thermodynamics and Friction: Avoiding Common Hand-Polishing Failures
Mechanical paint restoration is a thermodynamic process. While hand polishing generates significantly less heat than a rotary machine, the "Friction Paradox" remains a critical factor in surface safety. Attempting to accelerate the process through excessive stroke speed can raise the surface temperature of the clear coat to a point where the resin begins to soften. This thermal expansion makes the paint "gummy," causing the abrasive particles to drag rather than cut. When you're mastering how to remove swirl marks by hand, maintaining a steady, moderate pace is essential to prevent this structural softening and ensure a clean, predictable leveling of the clear coat.
Surface temperature management is the most overlooked variable in manual correction. Polishing in direct sunlight is a fundamental structural error. UV radiation and ambient heat can push panel temperatures well above 50°C (122°F), causing the lubricants in professional compounds to reach their flash point prematurely. When a compound "flashes," the abrasive particles are no longer encapsulated, leading to "pigtails." These are spiral-shaped micro-scratches caused by spent clear coat dust and dried abrasive material being ground back into the surface. Maintaining a cool, shaded environment is a non-negotiable requirement for professional results.
Environmental Control for Paint Correction
Predictable abrasive performance requires a controlled environment. The optimal surface temperature range for manual correction is between 15°C and 25°C (60°F to 77°F). High humidity can also extend the "open time" of polishes, which might seem beneficial but often leads to difficult residue removal. Pad cleanliness is equally vital. You must implement the "brush after every section" rule. Using a specialized pad brush to remove spent clear coat and dried compound prevents the buildup of debris that causes secondary marring. To maintain surface clarity and verify your progress, utilizing professional-grade detailing supplies ensures the surface remains lubricated and free of spent abrasive dust.
Identifying 'Sticky' Paint
Clear coat formulations vary significantly between manufacturers. Some European and Japanese paint systems exhibit "sticky" characteristics, where the resin reacts poorly to even moderate manual friction. Soft paint systems require less downward pressure and a higher lubricant-to-abrasive ratio to prevent hazing. Conversely, hard clear coats may require multiple passes with a heavy-cut compound. Recognizing the limits of manual work is a mark of professional competence. If a defect doesn't respond to three controlled passes, it likely requires a depth of correction that exceeds the safety margins of hand-working. In such cases, the focus must shift from total defect removal to surface refinement and chemical protection. Understanding how to remove swirl marks by hand involves knowing when the risk of material thinning outweighs the aesthetic benefit of further leveling.
Long-Term Surface Preservation: Beyond Correction
Completing the mechanical leveling process is a significant milestone, yet it leaves the clear coat in a vulnerable state. Freshly corrected paint is "naked," meaning the surface tension provided by previous waxes or environmental contaminants has been removed. This exposed resin is highly susceptible to UV degradation and new mechanical marring. While you have successfully learned how to remove swirl marks by hand, the longevity of that mirror finish depends on transitioning from mechanical correction to advanced chemical protection. Without a high-performance barrier, the smooth topography you've created will quickly accumulate new micro-scratches during routine maintenance washes.
Modern surface engineering favors semi-permanent solutions over traditional organic waxes. Utilizing a ceramic coating provides a covalent bond with the clear coat, creating a sacrificial layer that is significantly harder than the factory finish. This chemical integration effectively locks in the results of your manual labor. For enthusiasts seeking a comprehensive solution, a ceramic coating kit provides all the necessary components to establish a durable, high-solids barrier that can withstand environmental stressors for years rather than weeks.
The Science of Graphene Shielding
Graphene integration represents the current frontier in paint preservation. When applied to a corrected surface, graphene molecules organize into a hexagonal honeycomb lattice. This molecular structure provides exceptional tensile strength and hardness, which directly reduces the risk of future swirl marks. The primary benefit of this technology is the reduction of surface friction. A slicker, more hydrophobic surface ensures that abrasive particles slide off the panel during a wash rather than being ground into the clear coat. This technological advantage is why professional-grade coatings are the logical conclusion to the process of how to remove swirl marks by hand.
Maintenance Engineering
Preserving a corrected finish requires a strict adherence to the "Two-Bucket" wash method. This protocol utilizes one bucket for lubrication and a second for rinsing the wash mitt, effectively isolating removed dirt from the clean solution. You should strictly use high-GSM (grams per square meter) microfiber towels for all surface contact. These towels feature deep piles that safely encapsulate remaining micro-debris. The consistent use of professional car detailing products ensures that the pH balance of the surface remains stable, preventing the premature breakdown of your protective coating and maintaining the clear coat's structural integrity over the long term.
Advancing from Manual Restoration to Permanent Surface Integrity
Mastering the abrasive physics and thermodynamic variables discussed in this guide transforms a physically demanding task into a predictable engineering exercise. You now understand that successful surface leveling depends on the systematic application of SMAT technology and strict adherence to decontamination protocols. Mastering how to remove swirl marks by hand represents the first phase of a comprehensive surface preservation strategy. It's no longer about brute force; it's about the precise interaction between chemistry and clear coat topography.
Once you've achieved a mirror-like finish, the focus must shift to chemical shielding to lock in that clarity. Our aerospace-approved nanotechnology formulations are proudly manufactured in the USA, delivering professional-grade results for DIY enthusiasts who refuse to compromise on quality. These coatings provide the structural hardness necessary to prevent the return of micro-defects while enhancing the depth of the corrected surface. Transitioning from mechanical restoration to advanced graphene protection ensures your work remains visible for years rather than weeks.
Secure your finish with SKY MAXPRO Aerospace-Grade Ceramic Graphene Shield. With these engineering principles in place, you're ready to maintain a flawless finish that stands up to the most rigorous environmental challenges.
Frequently Asked Questions
Is it actually possible to remove all swirl marks by hand?
Yes, manual paint correction is highly effective for light to moderate defects using modern abrasive physics. While deep, random isolated scratches may reach the floor of the clear coat and require machine intervention, the majority of spider-web swirls can be leveled by hand. Success depends on using SMAT-based compounds and maintaining consistent pressure across 12x12-inch sections. This approach ensures a mirror finish while preserving more clear coat than aggressive machine polishing.
What is the best type of cloth to use for removing swirls by hand?
High-density microfiber applicators are the superior choice for the initial cutting stage. The increased surface area of the fibers provides more mechanical bite for the abrasive particles. For final gloss enhancement and finishing passes, transition to a closed-cell foam pad. You should never use cotton towels for correction, as their irregular fibers can introduce secondary marring. Always use clean, high-GSM microfiber towels for residue removal to prevent re-contaminating the leveled surface.
How long does it typically take to polish a whole car by hand?
A complete manual paint restoration typically requires between 4 and 8 hours of active work. This duration depends on the vehicle's total surface area and the initial density of the swirl marks. Because how to remove swirl marks by hand involves working in small 12x12-inch sections to maintain force consistency, the process is time-intensive. You must account for decontamination, sectioning, and final inspection to ensure a uniform, professional-grade result across all panels.
Can I use a heavy-cut compound by hand without damaging the paint?
Yes, heavy-cut compounds are safe for manual use when formulated with Super Micro Abrasive Technology. Unlike machine polishing, hand application lacks the high RPMs that generate excessive heat, reducing the risk of strike-through. However, you must follow the heavy-cut pass with a finishing polish to refine any micro-hazing. This two-stage approach ensures maximum defect removal while restoring the optical clarity and depth of the clear coat without structural compromise.
Will removing swirls by hand make my clear coat too thin?
Manual correction is fundamentally less aggressive than machine polishing, making it safer for maintaining clear coat thickness. While you are technically removing a microscopic layer of resin to level the defects, the material loss is minimal compared to rotary or dual-action tools. By understanding how to remove swirl marks by hand, you can target specific defects with precision. This allows you to achieve a swirl-free finish while preserving the maximum amount of protective clear coat for long-term durability.
Do I need to use a clay bar if I'm already polishing the car?
Mechanical decontamination with a clay bar is a non-negotiable prerequisite for any polishing work. If you skip this step, the polishing pad will trap bonded contaminants like industrial fallout or brake dust and drag them across the paint. This creates deep, linear scratches that undermine the restoration process. Using Final Touch I PRO Detailing Clay ensures the abrasive particles work directly on the clear coat, providing a smoother, more efficient leveling cycle.
How often should I have to remove swirl marks from my vehicle?
You should only need to perform full paint correction once or twice during a vehicle's lifespan if proper maintenance protocols are followed. Frequent polishing is a sign of improper washing techniques that re-introduce defects. By applying a long-term ceramic graphene shield after correction, you increase surface hardness and reduce friction. This protection, combined with the "Two-Bucket" wash method, preserves the mirror finish and eliminates the need for repeated abrasive leveling.
What is the difference between a polish and a wax when working by hand?
Polishing is a mechanical process designed to level the clear coat and remove defects permanently. Waxes and sealants are chemical protection layers that sit on top of the paint to provide UV resistance and hydrophobicity. While some waxes contain fillers that temporarily mask swirls, they do not correct the surface. True restoration requires using an abrasive polish to eliminate the V-shaped grooves, followed by a protective coating to lock in the refined finish.