
The most expensive ceramic coating on the market is destined for premature failure if your substrate engineering is flawed. Many enthusiasts fear the emergence of high spots or a bond that degrades within months, a valid concern given that the global high-performance coatings market is valued at 14.2 billion dollars in 2026. If you're uncertain whether polishing is mandatory or which chemicals meet the strict VOC limits effective August 18, 2026, you aren't alone. Mastering how to prep car for ceramic coating requires more than a simple wash; it demands a structured, engineering-led approach to surface decontamination.
We understand that you want a professional-grade, swirl-free finish without the overhead of a detailing shop. This guide outlines the aerospace-grade preparation protocol required to ensure maximum molecular bonding and long-term coating stability. You'll learn the exact sequence of chemical decontamination, mechanical claying, and solvent residue removal needed to transform your vehicle's paint into a surgically clean foundation for our Ceramic Graphene Shield. We'll move through a logical, data-driven process from initial degreasing to the final surface inspection to ensure your results mirror professional standards.
Key Takeaways
- Master the engineering principles of surface bonding to create the ideal "anchor pattern" required for permanent molecular cross-linking.
- Learn how to prep car for ceramic coating using high-alkaline chemical decontamination to emulsify legacy waxes and industrial fallout.
- Execute the professional "plastic bag test" to accurately diagnose the need for mechanical claying and select the appropriate clay grade.
- Understand why surface leveling and paint correction are the non-negotiable foundations for achieving maximum optical clarity and coating durability.
- Implement the final "No-Touch" protocol to prevent lipid re-contamination and ensure optimal environmental conditions for the curing process.
The Engineering of Surface Bonding: Why Preparation Dictates Coating Life
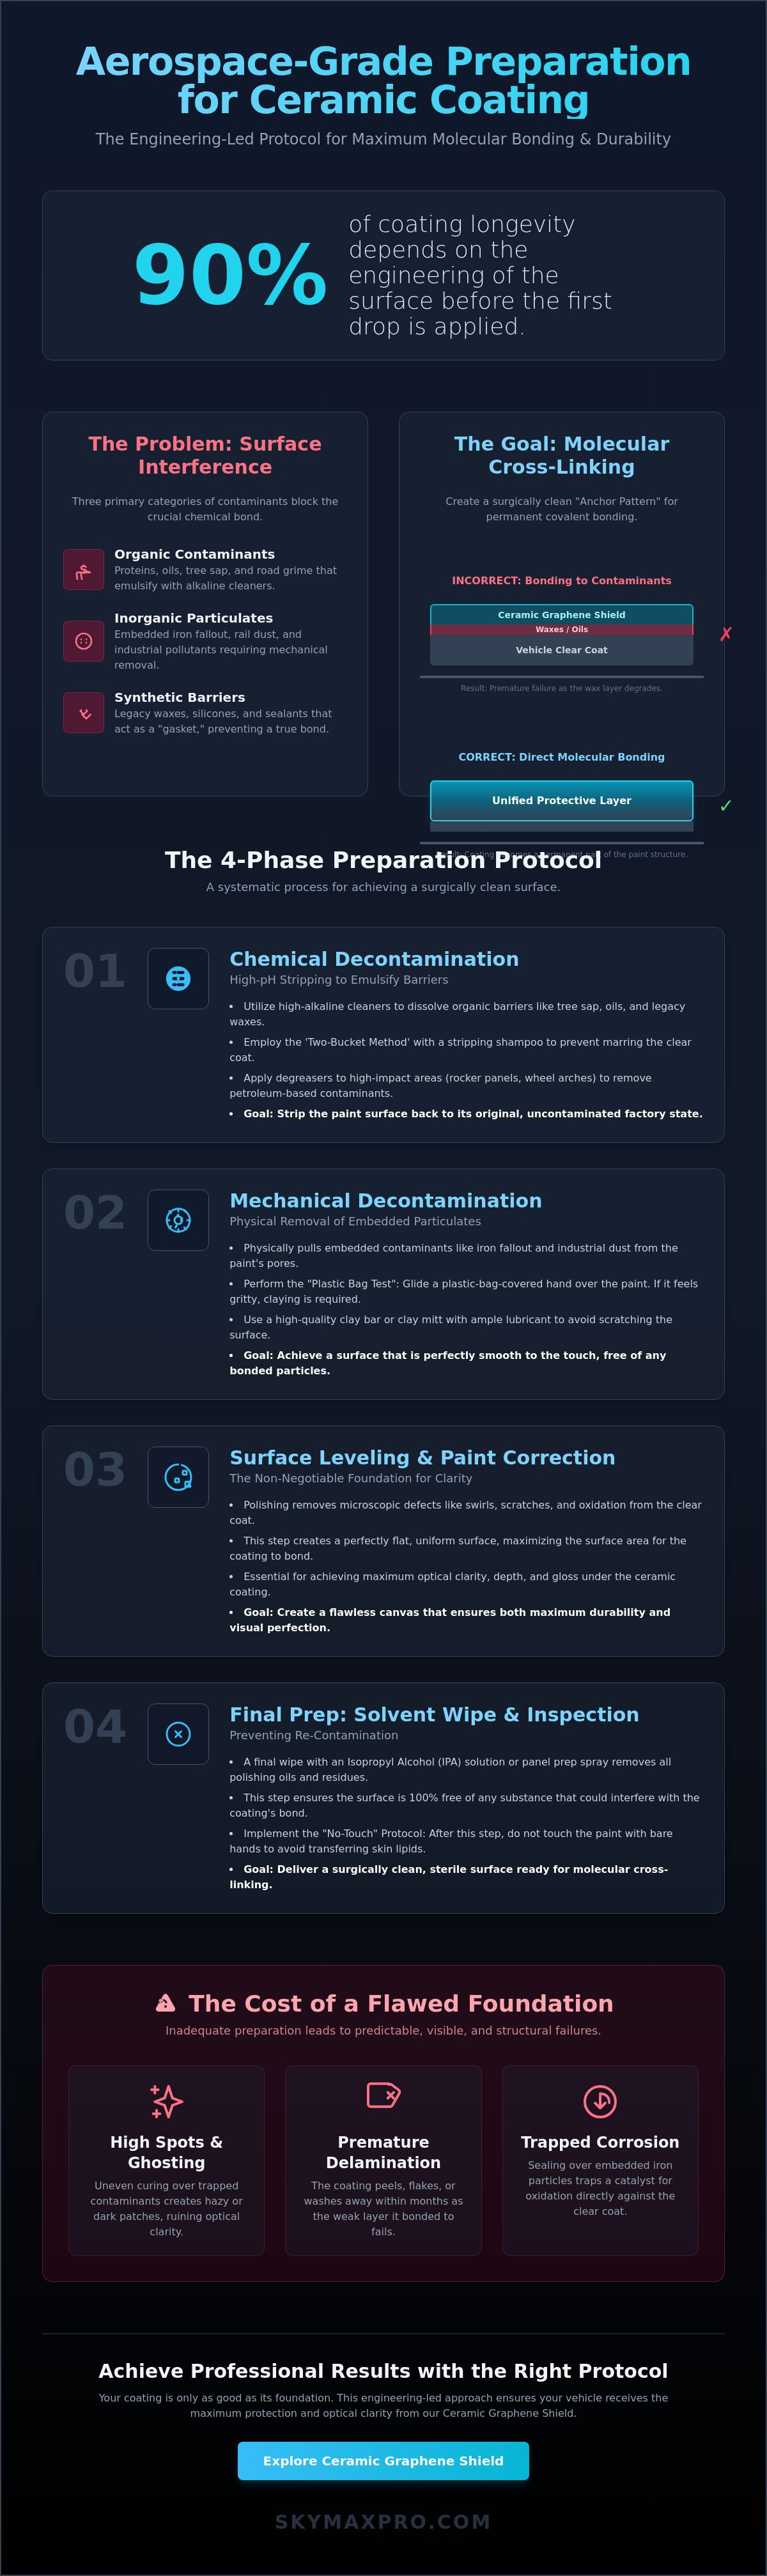
Surface preparation is the systematic removal of all microscopic barriers to facilitate a chemical process called molecular cross-linking. In professional detailing, we define success by the integrity of the "Anchor Pattern." This engineering concept refers to the creation of a clean substrate that provides the maximum surface area for the coating to grip. Without this foundation, even the most advanced formulas cannot function as intended. Understanding how to prep car for ceramic coating starts with identifying the three primary categories of surface interference: organic contaminants like proteins and oils, inorganic particulates such as iron fallout, and synthetic barriers including legacy waxes or silicones.
The 2026 standard for professional surface preparation has shifted toward an analytical, data-driven approach. It's no longer enough to simply wash the vehicle; we must ensure the surface energy of the paint is optimized for the specific polarity of the coating. This involves a multi-stage decontamination process that strips the surface back to its original factory state. By removing these layers, we allow the coating to become a permanent part of the vehicle's exterior rather than a temporary topper.
The Molecular Mechanics of Covalent Bonding
Modern Ceramic Graphene Shield technology relies on SiO2 and Graphene molecules forming covalent bonds with the vehicle's automotive paint composition. These molecules must penetrate the microscopic pores of the clear coat to create a unified, hardened structure. If residual waxes remain on the surface, they act as a "gasket" that prevents this deep interaction. The coating bonds to the temporary wax layer instead of the paint itself. When that wax eventually degrades under UV exposure, the ceramic layer delaminates, leading to premature failure. This is why aerospace engineering protocols demand a "surgically clean" surface; even trace amounts of skin oils or silicone can compromise the entire installation.
Consequences of Inadequate Preparation
Skipping critical steps in the decontamination process leads to visible defects and structural weaknesses. Trapped particles often manifest as "ghosting" or "high spots" where the coating has cured unevenly over a contaminant. If you apply a coating over embedded iron particles, you're sealing a catalyst for oxidation directly against your clear coat. This can lead to accelerated corrosion underneath the protective shield, effectively trapping damage in place. True coating failure occurs when the bond breaks at the substrate level. This is a direct result of poor preparation rather than the natural wear of the product over time. Longevity is 90% dependent on the engineering of the surface before the first drop of coating is applied.
Phase 1: Chemical Decontamination and High-PH Stripping
Phase 1 marks the transition from cosmetic maintenance to industrial-grade decontamination. Standard pH-neutral shampoos are engineered to leave existing protection intact, which is the exact opposite of the requirement for molecular bonding. To understand how to prep car for ceramic coating correctly, you must utilize high-alkaline cleaners that can emulsify organic barriers like tree sap, protein deposits, and legacy waxes. These aggressive surfactants break the surface tension of synthetic sealants, ensuring the paint is stripped to its original factory state. This process aligns with industry standards for surface preparation, where the removal of all non-integral layers is mandatory before applying a high-performance shield.
The Stripping Wash Protocol
The stripping wash requires a high-concentration solution designed to neutralize previous detailing products. While the goal is aggressive cleaning, the 'Two-Bucket Method' remains essential to prevent marring the clear coat with dislodged grit. Start by applying a thick foam layer to dwell, allowing the chemicals to break down surface tension. For high-impact areas like lower rocker panels and wheel arches, utilize Heavy Duty Red Power Degreaser to dissolve stubborn road film and petroleum-based contaminants. This step is critical because petroleum oils are highly resistant to standard soaps and will prevent the ceramic coating from cross-linking with the substrate. Always rinse thoroughly to ensure no high-pH residue remains in the panel gaps or trim seals.
Removing Inorganic Contaminants
Once organic materials are removed, you must address inorganic contaminants that are often invisible to the naked eye. Iron fallout, primarily composed of microscopic brake dust particles, becomes hot and embeds itself into the pores of the paint. A dedicated iron remover triggers a chemical reaction that turns these metallic particles into a water-soluble state, typically indicated by a purple color change. This process is non-abrasive and prevents the need for heavy scrubbing that could damage the finish.
Mineral deposits from hard water present another challenge. These 'water spots' are calcium and magnesium structures that bond to the clear coat. Before moving to mechanical steps, apply a specialized Water Spot Remover to chemically dissolve these minerals. Addressing these issues now prevents them from being trapped under the coating, which would otherwise require abrasive polishing to correct later. For those starting their first project, a complete Exterior Detailing Kit provides the necessary chemical range to handle these diverse contamination types safely.
Phase 2: Mechanical Decontamination with Detailing Clay
Mechanical decontamination is the secondary diagnostic and remedial step in the engineering sequence. It targets bonded contaminants that survived the high-pH stripping phase, such as industrial fallout, overspray, and tree sap. To determine if this step is necessary, perform the "Plastic Bag Test." By placing your hand inside a thin plastic film and sliding it across the washed surface, you amplify your tactile sensitivity to microscopic protrusions. If the surface feels textured rather than glass-smooth, mechanical intervention is mandatory. Understanding how to prep car for ceramic coating involves recognizing that these microscopic bumps will prevent the coating from achieving a uniform molecular bond.
Selecting the correct grade of clay is a balance between efficiency and safety. Fine-grade clay is suitable for vehicles with light contamination or those that receive regular maintenance. However, for a comprehensive ceramic prep, a medium-grade clay is often required to ensure the substrate is completely cleared of debris. The physics of this process relies on a hydrodynamic barrier; the clay must glide on a layer of lubricant to prevent it from sticking to and marring the paint. Without sufficient lubrication, the clay will shear against the clear coat, causing unnecessary damage that complicates the polishing phase.
The Professional Claying Sequence
To ensure systematic coverage and prevent missed sections, divide the vehicle into 2x2 foot areas. This structured approach allows you to focus on the specific needs of each panel while monitoring the condition of your clay. Using Final Touch I PRO Detailing Clay, apply light, linear pressure in overlapping passes. You shouldn't use circular motions, as linear strokes make any potential marring easier to correct during the polishing stage. The 'tack' feel is a momentary increase in resistance that signals the clay has successfully engaged with a bonded contaminant, which then subsides as the surface is cleared. Constantly fold the clay to reveal a fresh, clean surface, ensuring you aren't rubbing captured grit back into the paint.
Managing Surface Marring
It's a common misconception that claying is a finishing step. In reality, mechanical decontamination is a destructive process on a microscopic scale. Even with high-quality lubricants and professional techniques, the act of shearing contaminants from the clear coat can leave behind a slight haze or micro-marring, particularly on softer paint systems. This is why professional protocols always dictate that mechanical decontamination must be followed by a polishing step. Without leveling the surface after claying, these microscopic abrasions will be permanently sealed under the ceramic layer, significantly reducing optical clarity and gloss. For a complete list of tools required for this phase, consult our Professional Auto Detailing Checklist to ensure your workshop is properly equipped.
Phase 3: Surface Leveling and Solvent Residue Removal
Polishing is the non-negotiable foundation of the ceramic shine. While some industry sources suggest polishing is optional if scratches aren't visible, this ignores the engineering requirement for a "bare" substrate. Mechanical leveling removes the microscopic "peaks and valleys" in the clear coat, increasing the surface area available for the coating to grip. This process eliminates the oxidation and micro-haze that standard washing can't touch. Mastering how to prep car for ceramic coating requires you to move beyond cosmetic improvement; you're technically re-engineering the paint surface to optimize its surface energy for the upcoming chemical bond.
The "Paint Correction" spectrum ranges from a single-step gloss enhancement to multi-stage heavy compounding. A single-step polish is typically sufficient for newer vehicles to remove the micro-marring caused by the claying phase. For older finishes, a multi-stage approach is necessary to remove deeper defects. High-CRI (Color Rendering Index) lighting is mandatory during this phase. Standard garage lighting often masks residual polishing oils or fine holograms that will be permanently trapped once the coating cures. Verification under specialized lighting ensures the substrate is optically perfect before you proceed to the final chemical strip.
Abrasive Technology and Surface Clarity
Modern diminishing abrasives function by fracturing under the pressure and heat of the polishing pad, transitioning from a cutting compound to a fine finishing polish in a single cycle. It's critical to distinguish between "filling" and "removing" defects. Many consumer-grade polishes contain fillers or silicones that temporarily hide scratches. For professional results, you must use "pure" abrasives that leave nothing behind but leveled paint. This ensures the surface is structurally ready for the Ceramic Graphene Shield Coating, allowing the molecules to cross-link directly with the paint rather than a temporary filler material.
The Final Solvent Wipe Down
The most common cause of coating delamination is residual polishing oil. Even "oil-free" polishes use lubricants to prevent the pad from galling the paint. These lubricants are hydrophobic barriers that will reject the ceramic coating. A dedicated panel wipe or high-purity Isopropyl Alcohol (IPA) solution is required to chemically strip these last traces of interference. Standard glass cleaners are insufficient for this task because they often contain surfactants or fragrances that leave their own residue behind.
Perform the "Squeak Test" to verify the surface is 100% bare. When you slide a clean microfiber towel across a panel wiped with a professional prep spray, there should be a distinct resistance and a "squeaking" sound. This indicates the absence of all lubricants and oils. If the towel glides effortlessly, residual oils are still present, and the wipe-down must be repeated. For a complete system that includes both prep and protection, we recommend our Ceramic Coating Kit to ensure chemical compatibility across all stages.
The SKY MAXPRO Protocol: Final Checklist for Coating Success
The final phase of this protocol is a verification stage designed to eliminate any remaining variables that could interfere with the chemical bonding process. Once the substrate is leveled and the solvent wipe-down is complete, the vehicle exists in a state of high surface energy. This state is extremely receptive to the coating, but it's also vulnerable to re-contamination from environmental factors or human contact. Mastering how to prep car for ceramic coating correctly means treating your workspace like a laboratory. A single fingerprint or a stray dust particle can create a localized bond failure, compromising the uniformity of the protective layer.
Perform a 360-degree inspection using multiple light sources. A high-CRI flashlight is necessary to scan for residual polishing oils that may have been missed during the solvent wipe. If you detect any hazing or "rainbowing" under the light, the area must be re-cleaned immediately. This final walk-around is the last opportunity to ensure the substrate is surgically clean before the chemical application becomes permanent. Don't rush this inspection; precision here prevents hours of corrective work later.
Environmental Control for Bonding
Atmospheric conditions in your workspace directly influence the flash time and curing stability of the Ceramic Coating Kit. Optimal application temperatures range between 50°F and 80°F, with humidity levels ideally below 60%. High humidity accelerates the flashing process, which can make the coating difficult to level. Conversely, extreme cold can prevent the molecules from cross-linking effectively. You must avoid direct sunlight at all costs. UV radiation and surface heat cause solvents to evaporate prematurely, leading to permanent high spots. If you're working in a residential garage, keep all doors closed to minimize airborne particulates and wind-blown debris from settling on the bare paint during the final moments of the process.
Ready for Application
The vehicle has now reached the "Surgically Clean" state required for aerospace-grade results. All organic, inorganic, and synthetic barriers have been removed through the systematic engineering steps outlined in this guide. The clear coat is now a porous, high-energy substrate ready for the application of the Ceramic Graphene Shield. Maintaining this state requires strict adherence to the "No-Touch" rule. Always wear fresh nitrile gloves during the final inspection and application to prevent skin lipids from re-contaminating the surface.
Ensure your applicators are primed and your microfibers are lint-free before you begin. For a deeper technical analysis of the chemical reactions involved in the next phase, read our guide on The Engineering of Ceramic Coating. Your preparation is complete; you're now ready to lock in the results with the final protective layer.
Achieving Substrate Excellence for Long-Term Surface Integrity
The durability of your vehicle’s finish is determined long before the first layer of ceramic is applied. By following this aerospace-grade protocol, you've transitioned from basic maintenance to precise surface engineering. You've successfully removed organic barriers, neutralized inorganic contaminants, and leveled the clear coat to a mirror finish. Understanding how to prep car for ceramic coating is the single most important factor in ensuring the nanotechnology can achieve its full 5-year durability potential. This systematic approach ensures that the molecular cross-linking occurs on a surgically clean substrate, providing the maximum possible surface area for bonding.
Our formulations are manufactured in the USA with professional precision to meet the highest industry standards. You can now move forward with total confidence, knowing your preparation has laid the groundwork for professional-grade results at home. It's time to lock in that clarity and protect your investment against the elements. Secure Your 5-Year Protection with the Ceramic Graphene Shield Kit and experience the peak of aerospace-approved nanotechnology. Your vehicle is ready for its final transformation.
Frequently Asked Questions
Can I use dish soap to prep my car for a ceramic coating?
No, you shouldn't use dish soap for professional preparation. While it's a common DIY suggestion, dish soap contains surfactants, dyes, and fragrances designed to leave a film on surfaces. This residue acts as a barrier that prevents the coating from achieving proper molecular cross-linking. Instead, utilize a high-alkaline degreaser or a dedicated strip wash to ensure the paint is truly bare.
Is it necessary to polish my car before applying a ceramic coating?
Polishing is a mandatory step for professional-grade results. Even if your paint appears defect-free, mechanical leveling removes microscopic oxidation and legacy chemical residues that washing cannot reach. This process optimizes the surface energy of the clear coat, creating the ideal anchor pattern for the coating to grip. Skipping this step significantly reduces the longevity and optical clarity of the final finish.
How long does the ceramic coating preparation process take?
A comprehensive preparation protocol typically requires 8 to 16 hours of active labor. This duration depends on the vehicle's size and its initial paint condition. The process involves multiple stages, including chemical decontamination, mechanical claying, and at least one stage of paint correction. For the best outcome, plan for a two-day schedule to allow for meticulous inspection and surface verification.
What happens if I don't use a clay bar before coating?
If you skip mechanical decontamination, you'll permanently seal bonded contaminants like industrial fallout and tree sap under the ceramic layer. These particles create microscopic protrusions that interfere with the coating's bond, leading to premature delamination. The resulting surface will feel rough to the touch and will lack the mirror-like reflection achieved through a proper how to prep car for ceramic coating sequence.
Can I prep my car for ceramic coating outside in the sun?
No, you must perform surface preparation in a shaded, controlled environment. Direct sunlight increases the surface temperature of the paint, causing decontamination chemicals and solvent wipes to evaporate or "flash" prematurely. This leads to chemical spotting and uneven cleaning. For optimal chemical stability, maintain a surface temperature between 50°F and 80°F throughout the entire engineering process.
What is a panel wipe and why is it the most important step?
A panel wipe is a high-purity solvent, such as Isopropyl Alcohol or a dedicated prep spray, used to strip residual polishing oils. It's the most critical step because it's the final defense against bond failure. Even the smallest trace of lubricant left by a polish will reject the ceramic molecules. The panel wipe ensures the substrate is 100% bare and surgically clean before application.
How do I remove old wax or sealant before a ceramic coating?
Old protection is removed through high-pH chemical stripping. Standard pH-neutral soaps are designed to preserve waxes, so you must use an alkaline-heavy cleaner to emulsify synthetic sealants and organic carnauba. This chemical decontamination breaks the bond between the old wax and the paint. This is a fundamental part of how to prep car for ceramic coating to ensure no legacy products interfere with the new shield.
Do I need to prep a brand-new car for ceramic coating?
Yes, brand-new vehicles require the same systematic preparation as used ones. New cars often arrive with embedded rail dust from transport, adhesive residue from protective wraps, and temporary dealer-applied glazes. These contaminants must be removed through chemical and mechanical decontamination. Prepping a new car ensures the coating bonds directly to the factory clear coat rather than a layer of industrial transport fallout.