
What if the difference between a 15 year protective shield and a permanent, streaky mess is simply a misunderstanding of molecular adhesion? As the global high-performance ceramic coatings market reaches a projected value of $14.20 billion in 2026, the margin for error in home applications has narrowed significantly. You likely recognize that achieving a professional finish isn't about the price of the liquid, but the precision of the chemical bonding process. It's frustrating to invest $169.99 in a high-end Ceramic Graphene Shield only to have the results compromised by high spots or inadequate decontamination. This guide provides the technical framework to eliminate common DIY ceramic coating mistakes to avoid, ensuring your vehicle benefits from the latest advancements in surface engineering.
You'll master the specific protocols required for a flawless, high-gloss finish that meets industrial standards. We'll examine the critical prep steps, environmental variables, and application techniques that guarantee professional-grade results at home. By focusing on substrate readiness and curing physics, you can transform a standard detail into a long-term engineering success.
Key Takeaways
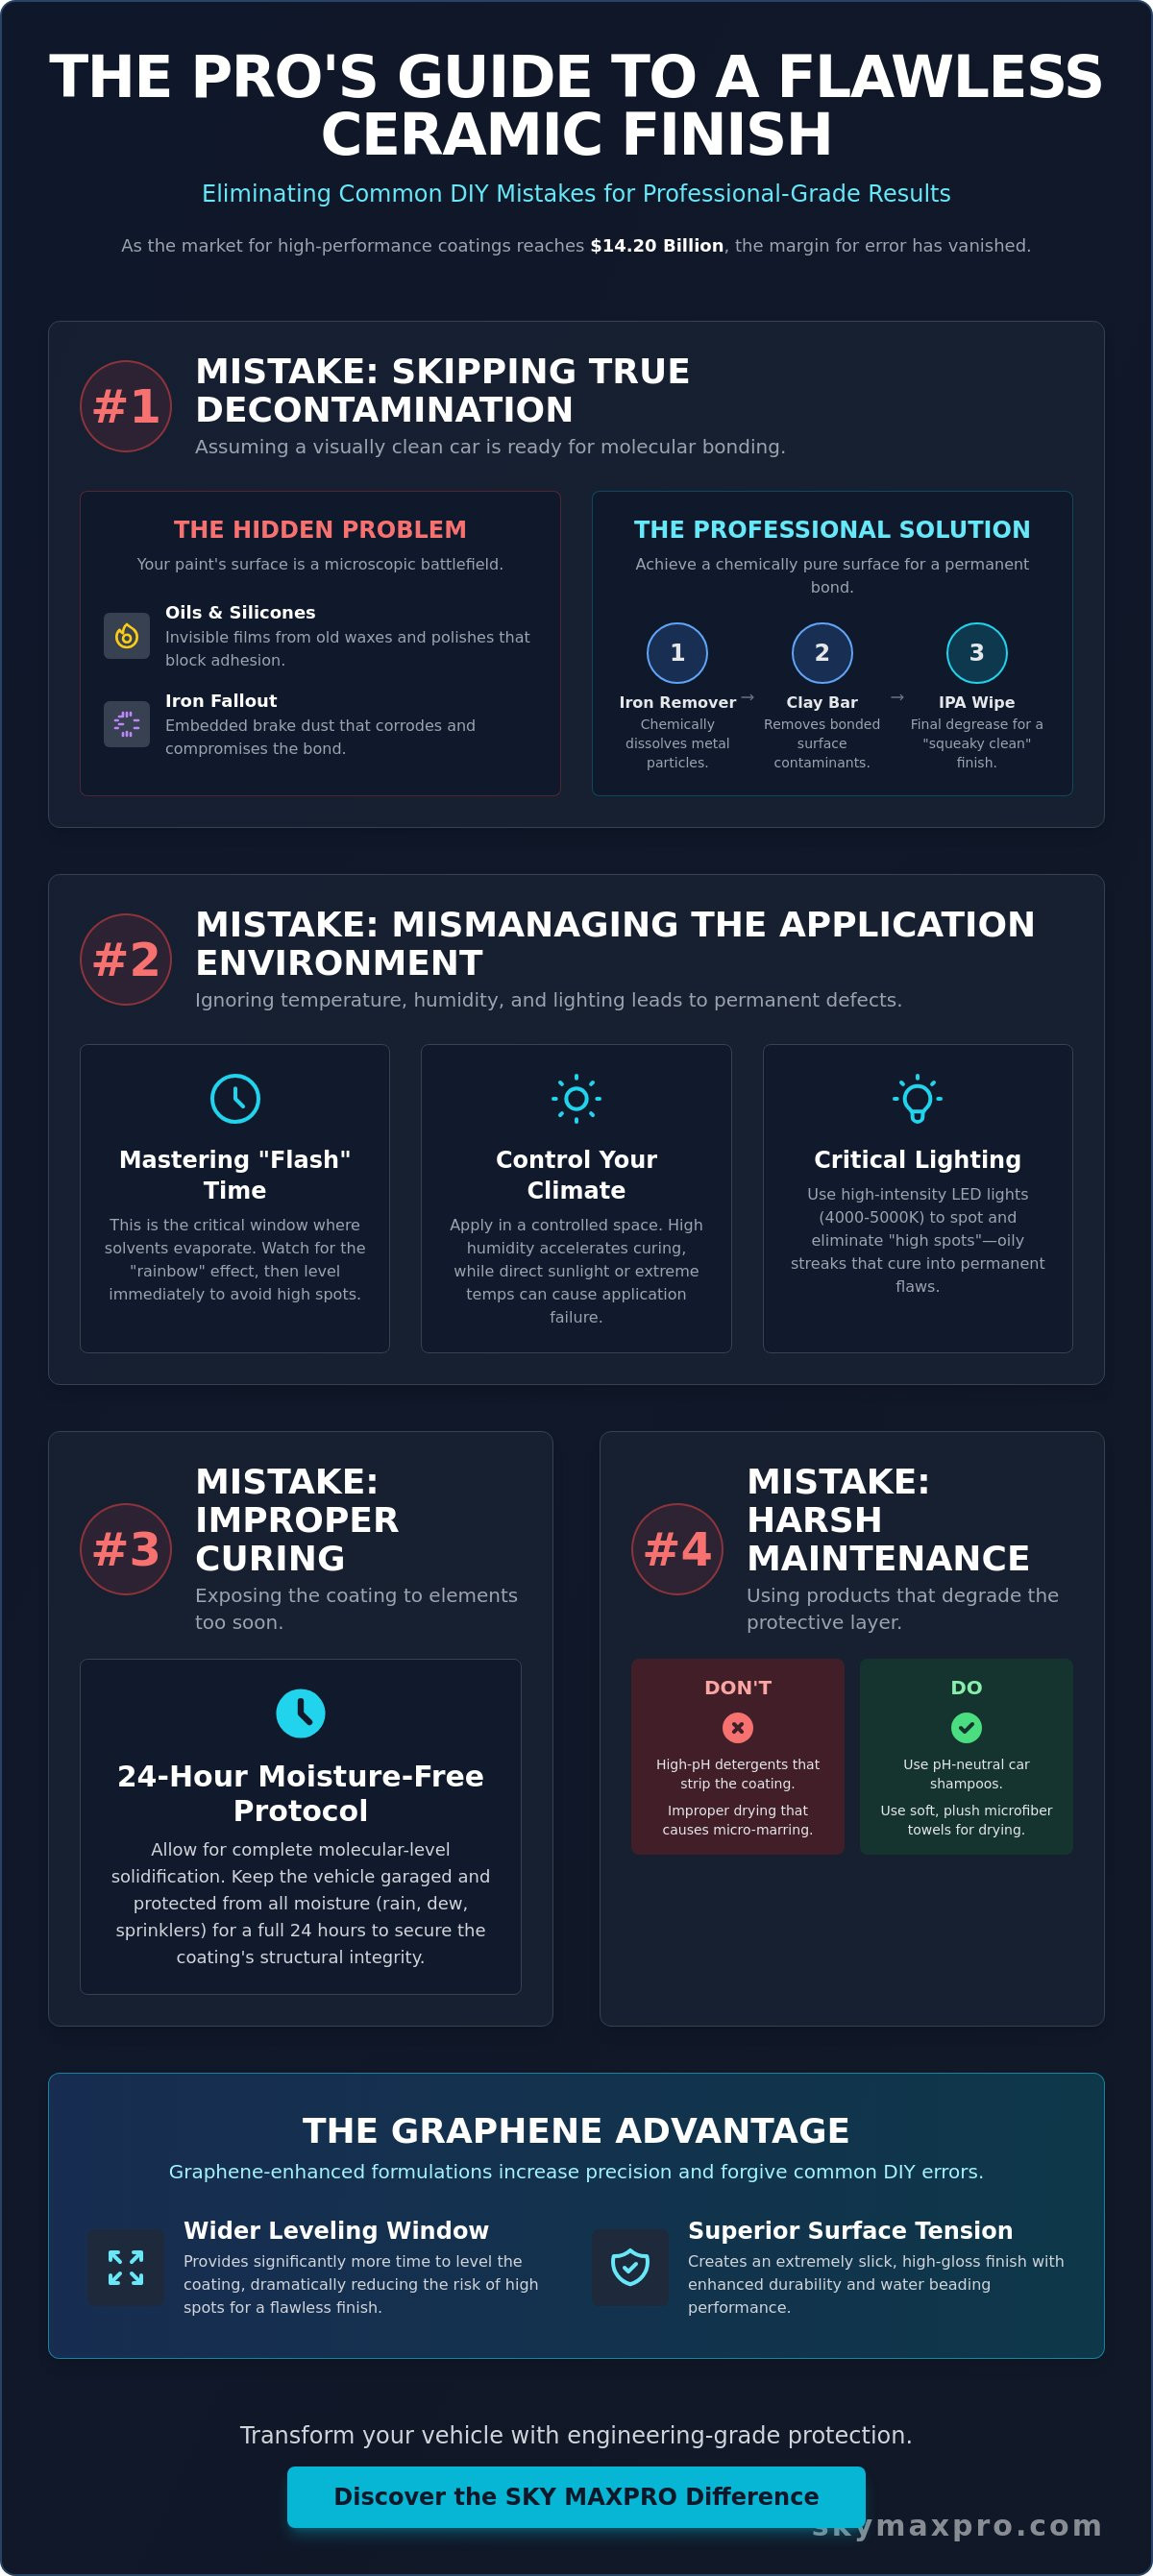
- Learn why surface preparation requires advanced chemical decontamination to remove industrial fallout and ensure a permanent molecular bond.
- Identify the primary DIY ceramic coating mistakes to avoid by mastering "flashing" mechanics and monitoring local humidity levels during application.
- Secure the coating's structural integrity by adhering to the 24-hour moisture-free curing protocol and understanding molecular-level solidification.
- Preserve your high-gloss finish by eliminating high-pH detergents and improper drying methods that cause micro-marring on the protective layer.
- Discover how graphene-enhanced formulations increase application precision by offering wider leveling windows and superior surface tension.
The Foundation of Failure: Neglecting Chemical Decontamination
A standard car wash is designed to remove loose surface debris, but it lacks the chemical strength to prepare a substrate for industrial-grade bonding. One of the most frequent DIY ceramic coating mistakes to avoid is assuming that a visually clean car is a chemically ready car. Ceramic coatings function through covalent bonding at the molecular level, meaning the liquid silica or graphene must integrate directly with the paint's pores. When microscopic contaminants remain, the coating attaches to the debris instead of the vehicle. This results in premature "sheeting" failure or the total loss of hydrophobicity within months rather than years.
Surface contaminants create a physical barrier that prevents proper molecular adhesion. While Paint protection film uses an adhesive layer that can bridge minor surface irregularities, ceramic coatings provide no such buffer. If the surface isn't stripped to a bare state, the coating's longevity is compromised from the moment of application. Achieving this state requires a multi-stage decontamination process that addresses both metallic and organic pollutants.
The Critical Role of Iron and Fallout Removal
Industrial fallout and brake dust consist of tiny iron particles that embed themselves into the heated clear coat. Mechanical claying with tools like Final Touch I PRO Detailing Clay is effective for removing the "heads" of these particles, but it often leaves the "roots" buried inside the paint. You must use a chemical iron remover to dissolve these metallic remnants. A successful reaction is identified by a deep purple "bleeding" effect, indicating that the chemical is breaking down the iron at the root. Skipping this step is a primary reason why many DIY projects fail to reach their maximum durability potential.
Degreasing: The Final Barrier to Adhesion
Even after washing and claying, the paint surface often retains residual oils from previous waxes, silicone-heavy polishes, or surfactants left behind by car soaps. These oils are invisible to the naked eye but act as a non-stick barrier for the ceramic liquid. To ensure a professional-grade bond, you must perform a final wipe-down with a dedicated degreaser like Heavy Duty Red Power Degreaser or a high-concentration Isopropyl Alcohol (IPA) solution.
- The Squeaky Clean Test: Run a clean, dry microfiber towel across the panel with light pressure. If the towel glides silently, oils are still present. A truly decontaminated surface will offer slight resistance and produce a distinct "squeak" sound.
- Surfactant Removal: Ensure all soap residues are neutralized, as modern "wash and wax" soaps contain gloss enhancers that interfere with coating cross-linking.
- Environmental Control: Perform this final degreasing step in a dust-free environment to prevent new airborne particles from settling on the bare substrate.
By treating the preparation phase as an engineering requirement rather than a cleaning chore, you eliminate the variables that lead to common DIY ceramic coating mistakes to avoid. A chemically pure surface is the only way to guarantee that the $169.99 investment in a Ceramic Graphene Shield performs to its laboratory-tested specifications.
Application Mechanics: Miscalculating Flash Times and Environment
Precision in application is what separates a professional finish from a botched project. Once the substrate is decontaminated, you must manage the chemical transition known as "flashing." This is the critical window where carrier solvents evaporate, allowing the active SiO2 or graphene molecules to cross-link with the paint. Misjudging this timing is one of the most common DIY ceramic coating mistakes to avoid. To understand what ceramic coatings are in a functional sense, you must view them as a semi-permanent chemical bond that requires specific thermodynamic conditions to stabilize correctly.
Lighting is a non-negotiable requirement for this process. You cannot apply these products in low-light conditions or under standard garage bulbs. Use high-intensity LED lamps with a color temperature between 4000K and 5000K. This specific spectrum reveals "high spots," which are areas where excess product wasn't leveled, appearing as dark, oily streaks. If these aren't identified during the liquid phase, they'll cure into permanent defects that require abrasive polishing to remove.
Controlling the Application Environment
Engineering success depends on atmospheric stability. The ideal temperature range for application is 60°F to 80°F. If the panel temperature exceeds 85°F, solvents evaporate too quickly, leading to "flash drying" before the polymer can level. Conversely, humidity levels above 70% can slow the evaporation process, causing the coating to remain oily and prone to smearing. Aim for 50% relative humidity to ensure a predictable bonding cycle. Never apply coatings in direct sunlight; infrared heat accelerates chemical reactions uncontrollably, making the product impossible to level.
The Art of the Leveling Wipe
Leveling is the mechanical removal of excess residue to ensure a uniform layer thickness. You should use a two-towel method for maximum precision. The first towel removes 90% of the excess liquid, while the second towel buffs the surface to a high-gloss finish. Watch for the "rainbow effect," a visual distortion similar to oil on water, which indicates the coating is ready for leveling. If the towel begins to feel "grabby" or tacky, the solvent has evaporated too far, and you must level the area immediately.
If you discover a high spot within the first 30 minutes, you can often "reactivate" the area by applying a small amount of fresh product over the streak. The solvents in the new layer will soften the partially cured material, allowing for a second chance at leveling. For a more forgiving application window, the Ceramic Graphene Shield Coating offers advanced chemistry that simplifies this process for home users while maintaining industrial-grade durability.
Post-Application Errors: Improper Curing and Exposure
Successful application doesn't end when the final leveling wipe is complete. The curing phase is a delicate chemical transition that determines the coating's final hardness and refractive index. One of the primary DIY ceramic coating mistakes to avoid is exposing the vehicle to the elements before the molecular lattice has fully stabilized. While the benefits of ceramic coating include extreme chemical resistance and UV protection, these properties aren't active until the curing process is complete. If you rush the return to service, you risk locking in water spots or compromising the bond's structural integrity.
There's a critical distinction between physical and chemical curing. Physical curing occurs within the first few minutes as carrier solvents evaporate, leaving the coating "tack-free." Chemical curing is the slower process where the SiO2 or graphene molecules cross-link with each other and the substrate. This process requires a controlled, moisture-free environment. Applying a "topper" or wax too early is a common error; it traps evaporating solvents beneath a secondary layer, leading to a hazy or cloudy finish that ruins the clarity of the clear coat.
The First 24 Hours: Critical Protection
During the initial 24-hour window, moisture is the coating's greatest enemy. Rain, morning dew, or even high-pressure sprinklers can interfere with the cross-linking process. If water contacts the surface during this period, it can cause "osmotic blistering" or permanent mineral spotting within the soft coating. If the car does get wet prematurely, don't rub the surface with a dry towel. Instead, gently blow-dry the area or use a plush, damp microfiber to blot the water away, then return the vehicle to a dry, enclosed space immediately. Airborne pollutants like dust and pollen can also become embedded in the uncured layer, creating a gritty texture that's difficult to correct.
The 7-Day Full Cure Window
Even after the first 24 hours, the coating remains chemically "soft" for approximately seven days. During this week, you must avoid all car soaps, even those labeled as pH-neutral. Surfactants can disrupt the final hardening of the polymer.
- Environmental Hazards: Bird droppings and bug guts are highly acidic. If they land on a coating that hasn't reached full Shore hardness, they can etch through the protection in hours.
- Washing Protocol: If the vehicle becomes dusty, use only filtered water or a dedicated Ceramic Waterless Car wash to gently lift debris without mechanical friction.
- Chemical Exposure: Avoid parking near industrial sites or commercial kitchens where grease and chemical fallout are prevalent during this stabilization week.
By respecting these engineering timelines, you ensure the Ceramic Graphene Shield reaches its maximum laboratory-tested durability. Patience during the curing phase is just as vital as the precision used during the application itself.
Maintenance Myths: Why Coatings Are Not "Set It and Forget It"
The belief that a ceramic layer provides permanent, maintenance-free invincibility is a common misconception. This technical misunderstanding is one of the most critical DIY ceramic coating mistakes to avoid. While the molecular bond is significantly stronger than traditional carnauba wax, it isn't immune to chemical or mechanical degradation. High-pH soaps used in automatic touchless car washes often reach levels of pH 12 or higher. These caustic chemicals are designed to strip organic matter but can also slowly erode the hydrophobic top layer of your coating, leading to a "muted" gloss and reduced water sheeting performance.
Mechanical friction remains a risk even after the coating has fully cured. Improper drying techniques are a primary source of micro-marring. Even with a 9H hardness rating, dragging a contaminated towel across the surface will create microscopic scratches. To maintain the refractive clarity of the clear coat, you must treat the coating as a high-performance substrate that requires specific maintenance protocols to reach its maximum engineering potential.
The Safe Wash Method
Maintaining the structural integrity of the coating requires a methodical approach. You should utilize the two-bucket method equipped with grit guards to prevent cross-contamination of debris. Physical contact must be minimized. When washing, select a pH-neutral shampoo specifically engineered for ceramic surfaces. These formulas don't contain the waxes or gloss enhancers that could clog the coating's pores and diminish its hydrophobic properties. For drying, forced air is the preferred engineering solution to eliminate friction. If air isn't available, use a high-GSM microfiber towel, typically 500 GSM or higher, to blot the surface rather than wiping it.
Revitalizing the Hydrophobic Effect
Over time, a coating may appear to have failed because it no longer beads water. In many cases, the coating is simply "clogged" with mineral deposits, road film, or industrial fallout. You don't necessarily need to reapply the system. Instead, identifying the type of contamination is key. Use a Water Spot Remover to dissolve calcium and magnesium deposits that have bonded to the surface. Occasionally, a light mechanical decontamination with Final Touch I PRO Detailing Clay is necessary to remove stubborn particles that have settled on top of the shield.
- Sacrificial Layers: Apply a Quick Detailer Spray with Ceramic High Gloss Finish every 3 to 4 months to serve as a sacrificial barrier.
- Chemical Decontamination: Use a dedicated iron remover twice a year to clear embedded metallic particles from the coating's lattice.
- Lifespan Extension: Regular maintenance with SiO2-infused detailers can extend the effective lifespan of a 5-year coating by up to 20%.
By treating maintenance as a scheduled engineering requirement, you ensure the longevity of your surface protection. A well-maintained coating doesn't just look better; it continues to provide the industrial-grade defense your vehicle deserves.
Engineering Precision with SKY MAXPRO Ceramic Graphene Shield
SKY MAXPRO bridges the gap between industrial-grade protection and residential application. Many DIY ceramic coating mistakes to avoid stem from using fragmented products that lack chemical synergy. By utilizing a comprehensive ceramic coating kit, you eliminate the risk of component mismatch. This ensures that every chemical layer, from the initial degreaser to the final graphene shield, is engineered to bond seamlessly. Our aerospace-grade formulations are designed to simplify the complex bonding process, making professional results attainable for the home detailer.
Graphene technology represents a significant advancement in surface engineering. Traditional ceramic formulas often have narrow "flash" windows that are difficult to manage in non-controlled environments. Our graphene-infused coatings offer a wider application temperature range and more intuitive leveling. This chemical flexibility reduces the likelihood of high spots and streaking. You receive a more forgiving experience without sacrificing the 9H hardness required for long-term protection. The result is a surface with higher tensile strength and superior thermal dissipation compared to standard SiO2 products.
The SKY MAXPRO Difference
Our chemical engineering team focuses on high-concentration formulas that deliver measurable results. We've moved beyond standard consumer-grade liquids to provide durability that meets industrial standards. Our commitment to innovation ensures that our products are not only effective but also environmentally responsible.
- Eco-Friendly Engineering: Our formulations are VOC-free, aligning with strict environmental regulations like California’s Rule 1151 amendments that took effect on May 1, 2025.
- Integrated Systems: Every product is a component of a larger ecosystem. The Heavy Duty Red Power Degreaser is specifically formulated to prepare the paint for the Ceramic Graphene Shield's molecular lattice.
- Professional Durability: We focus on the molecular density of the coating, providing a shield that resists chemical etching from bird droppings and industrial fallout for over 60 months.
Your Road to a Flawless Finish
Success in surface protection isn't accidental; it's the result of following a defined technical protocol. Every SKY MAXPRO kit includes step-by-step guidance that mirrors professional detailing workflows. You gain access to the same car detailing supplies used by industrial specialists, ensuring your home garage functions with professional-level efficiency. Before you begin, verify your readiness with a final engineering checklist. Ensure your panel temperature is between 60°F and 80°F, your lighting is sufficient to detect oily residues, and your substrate has passed the "squeaky clean" resistance test.
By adhering to these standards and utilizing advanced graphene chemistry, you bypass the common DIY ceramic coating mistakes to avoid that plague lesser products. You aren't just cleaning your vehicle; you're applying a precision-engineered barrier designed for the future of automotive protection.
Achieving Industrial-Grade Protection Through Technical Precision
Shifting from a standard car wash mindset to a rigorous engineering approach is the only way to ensure your surface protection performs as designed. By mastering chemical decontamination and respecting the 60°F to 80°F application window, you effectively eliminate the primary DIY ceramic coating mistakes to avoid. Success relies on the molecular bond between the paint and the shield, a process that demands both high-performance chemistry and disciplined execution. Professional-grade results are no longer reserved for specialist shops; they're attainable for any detailer who prioritizes substrate readiness and atmospheric control.
Professional results are within reach when you utilize tools designed for aerospace-grade performance. Our systems are manufactured in the USA and come with a 5-year durability guarantee to ensure your investment remains secure against environmental degradation. You're ready to Shop the Professional Ceramic Graphene Shield Kit and apply the same nanotechnology used in industrial sectors. Take control of your vehicle's longevity with the confidence that only engineering-grade supplies can provide. Your commitment to precision will be reflected in a flawless, high-gloss finish that lasts for years.
Frequently Asked Questions
What happens if I apply ceramic coating in direct sunlight?
Applying a coating in direct sunlight causes the carrier solvents to evaporate at an uncontrollable rate. This leads to "flash drying," where the product hardens before you can level it. It's a primary DIY ceramic coating mistake to avoid because infrared heat accelerates chemical cross-linking, resulting in permanent streaks and a compromised molecular bond. Always work on a cool panel in a shaded, temperature-controlled environment.
Can I apply a second layer of ceramic coating to fix mistakes?
No, a second layer won't hide high spots or leveling errors. Ceramic coatings are transparent; applying more product simply seals the original defect beneath a new layer of hardened silica or graphene. If you have streaks or high spots, you must correct them during the initial liquid phase or through mechanical polishing before attempting to add more thickness to the protective shield.
How do I remove high spots if the coating has already cured?
Once the coating has cured past the 24-hour mark, high spots require mechanical abrasion for removal. You'll need to use a fine polishing compound and a microfiber applicator to level the excess material down to the clear coat. After the defect is removed, the area must be chemically degreased again to ensure a fresh application of the coating can bond correctly to the bare substrate.
Is a clay bar necessary if my car is brand new?
Yes, a clay bar is mandatory because new vehicles accumulate industrial fallout and rail dust during transport from the factory. Even a car with under 50 miles can have bonded metallic particles that interfere with molecular adhesion. Skipping this step is one of the most frequent DIY ceramic coating mistakes to avoid, as it prevents the coating from integrating with the paint's pores.
Can I use a ceramic coating on plastic trim and glass?
You can, but you must use a formula compatible with those specific materials. While graphene coatings work well on many surfaces, porous plastic trim often requires a specialized Ceramic Trim Plastic Restorer to prevent whitening. Glass surfaces need specific glass-engineered coatings to ensure that wiper blades don't chatter. Always verify the substrate compatibility on the product technical data sheet before application.
How long should I wait to wash my car after ceramic coating?
You must wait a minimum of seven days before using any surfactants or car soaps on the new surface. While the coating is "dry" within 24 hours, it takes a full week to reach its maximum chemical Shore hardness. Washing the vehicle prematurely can disrupt the final cross-linking process, leading to a significant reduction in the coating's projected 5-year lifespan.
What is the difference between a ceramic spray and a professional coating kit?
The primary difference lies in the concentration of active solids and the resulting durability. A professional kit like the Ceramic Graphene Shield provides a semi-permanent bond lasting up to 60 months. Ceramic sprays are maintenance products with lower resin content, designed for 3 to 6 months of protection. Kits require more precise environmental control but offer vastly superior chemical and UV resistance.
Will ceramic coating prevent rock chips and deep scratches?
No, ceramic coatings don't provide enough physical mass to stop high-velocity rock impacts or deep key scratches. They're engineered to resist micro-marring, bird dropping etchings, and UV degradation. A coating is typically only 2 to 3 microns thick; for impact protection against road debris, you must install a dedicated paint protection film (PPF) before applying your ceramic topcoat.